

How to Sharpen Garden Shears at Home
Table of Contents
- What You'll Need Before You Start
- Identifying Your Shear Type: Bypass, Anvil, and Hedge Shears
- Cleaning and Preparing Your Garden Shears
- Disassembling Your Shears for Safe Access
- How to Sharpen Pruning Shears Step by Step
- Best Sharpener for Garden Shears: Choosing Your Tool
- How to Sharpen Hedge Shears Effectively
- Garden Shear Sharpening Mistakes to Avoid
- Frequently Asked Questions
Last Updated: October 6, 2026
What You'll Need Before You Start
Learning how to sharpen garden shears at home requires just a few basic tools and materials. You don't need expensive equipment or a workshop to get the job done right. Most items you probably already have on hand.
Here's what to gather before you begin:
- Sharpening tool: A whetstone, diamond file, or hand sharpener designed for garden tools
- Cleaning supplies: Old cloth or rag, warm water, dish soap, steel wool or fine brush
- Safety gear: Work gloves and eye protection (small metal particles can fly during sharpening)
- Lubricant: Light machine oil or tool oil for final maintenance
- Optional: Screwdriver or hex key if your shears have a removable pivot bolt
- Flat surface: A stable work table or bench where you can secure your shears
The right sharpening tool makes the biggest difference. Whetstones work well for most gardeners because they're affordable and durable. Diamond files are faster but cost more. Hand sharpeners are convenient but less precise for detailed work.
Keep your workspace well-lit so you can see the blade edge clearly. Good lighting helps you maintain proper angle and avoid mistakes. A damp cloth nearby lets you wipe away metal shavings as you work.
Identifying Your Shear Type: Bypass, Anvil, and Hedge Shears
Garden shears come in three main types, and each sharpens slightly differently. Knowing which type you have helps you apply the right technique and avoid damaging the blades.
Bypass shears have two curved blades that slide past each other like scissors. One blade is sharp and does the cutting. The other blade is flat and acts as a base.
Anvil shears have one sharp blade that cuts down onto a flat, stationary base. The anvil (the flat part) doesn't move.
Hedge shears have long, straight blades designed to cut many branches at once. Both blades are sharp and work together.
Look at your shears' design. If the blades cross like scissors, you have bypass shears. If one blade sits flat and stationary, you have anvil shears.
Cleaning and Preparing Your Garden Shears
Before you sharpen anything, clean your shears thoroughly. Dirt, sap, and rust dull blades faster and interfere with sharpening. A clean blade is easier to sharpen and easier to see while you work.
Removing sap and plant residue
Sap builds up on blades during cutting and hardens over time. It dulls the edge and makes sharpening difficult. Warm water and dish soap remove most sap, but stubborn buildup needs more aggressive cleaning.
Fill a bucket with warm water and add a squirt of dish soap. Soak your shears for 10 minutes. Use an old cloth to scrub the blades and handles, paying special attention to the blade edges where sap accumulates.
Rubbing alcohol works faster on stubborn sap. Dampen a cloth with alcohol and rub the affected areas. Let it sit for a minute, then scrub. Rinse with clean water and dry completely with a cloth.
Never use a pressure washer or soak shears for hours. Too much water can damage the pivot joint and cause rust. Quick soaking and scrubbing is enough.
Removing rust and debris
Rust weakens blades and makes sharpening uneven. Light surface rust comes off easily. Heavy rust requires more effort but is still manageable at home.
For light rust, use fine steel wool or a soft abrasive pad. Rub gently along the blade in the direction of the grain. Don't scrub hard, you want to remove rust without removing blade material. Wipe away rust particles with a damp cloth.
For heavier rust, soak the affected area in white vinegar for 15 minutes. The acid breaks down rust. Then scrub with steel wool. Repeat if needed. Rinse and dry completely.
After cleaning, inspect the blades for any remaining debris or discoloration. A clean blade shows the true cutting edge and makes it easier to see your sharpening progress.
Disassembling Your Shears for Safe Access
Many shears can be disassembled to make sharpening easier.
Check your shears for a pivot bolt, the screw or bolt that holds the two blades together. Most bypass and anvil shears have one.
Loosening the pivot bolt lets you open the blades wider and position them for sharpening. If you remove it entirely, keep it in a safe place.
Some shears have a spring attached to the pivot bolt. Note how it's positioned before you loosen anything.
For hedge shears, disassembly is usually unnecessary. Their straight blades are easy to access and sharpen without taking them apart.
Never force a stuck bolt. If it won't budge, apply penetrating oil and wait 10 minutes. Try again gently. Forcing it can strip the bolt or damage the shears.
How to Sharpen Pruning Shears Step by Step
The process to sharpen garden shears is straightforward when you follow the right steps. The key is maintaining a consistent angle and using smooth, controlled strokes. Most shears sharpen in 10 to 15 minutes once you get the technique down.
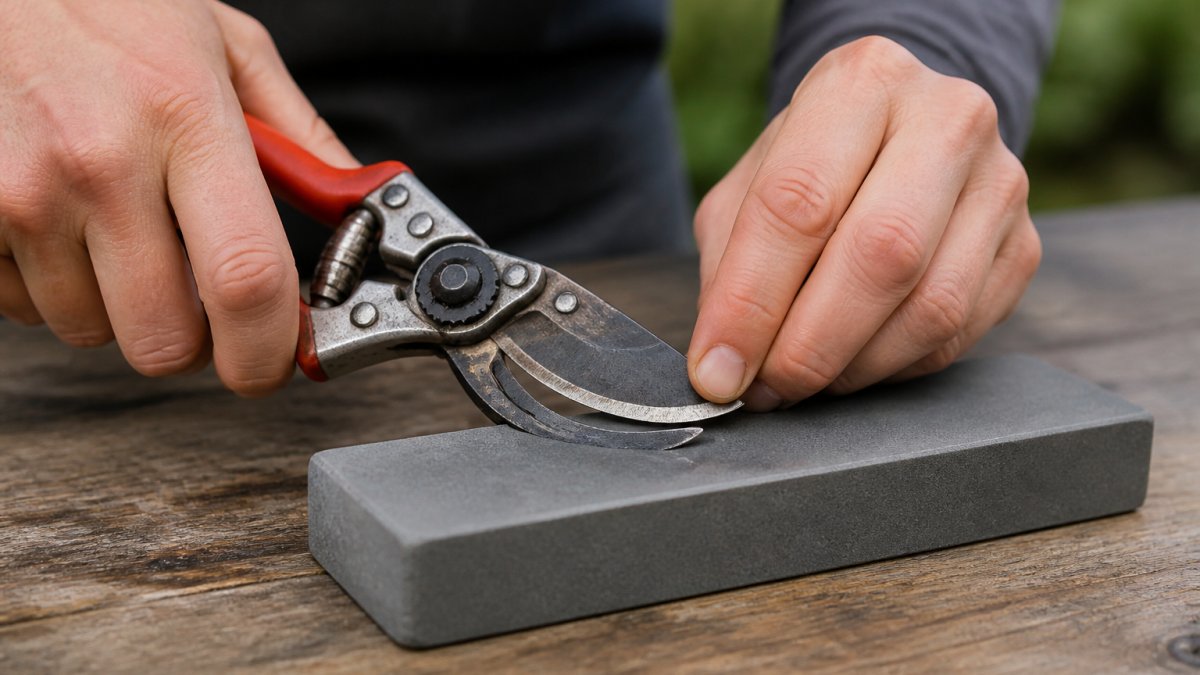
Identifying the cutting blade and bevel
The cutting blade is the sharp one that does the actual cutting. On bypass shears, it's usually the curved blade. On anvil shears, it's the single sharp blade on top. The bevel is the angled surface along the cutting edge.
Look at your blade closely. The bevel is the sloped part that comes to a point at the edge. It's usually on one side of the blade only, not both sides. This angle is what you'll sharpen.
Run your finger gently along the blade edge (carefully, it's sharp). You'll feel the bevel angle. It's typically between 20 and 30 degrees from flat. Most home gardeners don't need to measure this precisely.
Mark the blade with a marker if it helps you see the bevel clearly. The marker will rub off as you sharpen, showing you which areas need more work.
Maintaining a consistent sharpening angle
The angle you maintain while sharpening determines how sharp your blade becomes. Keep the sharpening tool at the same angle as the bevel throughout each stroke. This is the most important part of the process.
Position your sharpening tool against the bevel. Hold it at the same angle as the blade edge. If the bevel is 30 degrees, your tool should be 30 degrees too. Don't change the angle mid-stroke.
Use your non-dominant hand to guide the angle. Rest your fingers on the blade to help keep the tool steady. This takes practice but becomes natural quickly.
Work slowly and deliberately. Rushing leads to inconsistent angles and poor results. Each stroke should feel controlled and deliberate.
Filing strokes and creating a sharp edge
Use smooth, flowing strokes along the blade edge. Start at the base of the blade and draw the sharpening tool toward the tip. One direction only, don't saw back and forth.
Apply light to medium pressure. You're not trying to remove a lot of material. Just enough to expose the fresh, sharp steel underneath. Heavy pressure doesn't sharpen faster; it just wastes effort.
Count your strokes. Most blades need 10 to 20 strokes per side to sharpen properly. Start with 10 and check your progress.
Watch for a small metal burr forming along the blade edge. This thin line of raised metal appears as you sharpen. It means you're creating a new edge.
Wipe the blade clean with a damp cloth after every few strokes. This removes metal particles and lets you see your progress clearly.
Best Sharpener for Garden Shears: Choosing Your Tool
The right sharpening tool makes the job easier and produces better results. Different tools work better for different situations, so choose based on your needs and comfort level.
A whetstone is the most versatile option for home gardeners. It works on all shear types and produces an excellent edge.
A diamond file sharpens faster than a whetstone and requires less pressure. It's ideal if you have multiple shears to sharpen or prefer speed over precision.
A hand sharpener designed specifically for garden tools is the easiest option for beginners. You simply slide the blade through a slot, and the sharpener does the work. These are quick and consistent but less precise.
For most home gardeners, a whetstone or hand sharpener is the best choice. Start with whichever feels most comfortable. You can always upgrade later if you sharpen shears regularly.
How to Sharpen Hedge Shears Effectively
Hedge shears require a slightly different approach because both blades are sharp and cutting edges. You'll sharpen both sides, but the process is similar to pruning shears.
Lay the hedge shears on your work surface with one blade facing up. Identify the bevel on that blade. It's usually on the top surface.
Use the same smooth strokes you used for pruning shears. Work from the base toward the tip. Count your strokes and check your progress frequently.
Hedge shears often have longer blades than pruning shears. You may need 15 to 25 strokes per blade depending on length. Work in sections if the blade is very long.
After sharpening both blades, test the shears on a thin branch. They should cut smoothly without crushing the plant. If they still feel dull, do a few more strokes on each blade.
Garden Shear Sharpening Mistakes to Avoid
Even experienced gardeners make mistakes that dull blades or damage shears. Knowing what to avoid saves time and frustration.
Sharpening at the wrong angle is the most common mistake.
Applying too much pressure wears out your sharpening tool and removes more blade material than necessary. Light, steady pressure is enough.
Sharpening the flat side of the blade instead of the beveled side ruins the blade. Always sharpen the angled side only.
Skipping the cleaning step wastes your effort. Sap and rust prevent sharp edges from forming. Clean thoroughly before you start.
Not checking your work means you might stop too early or keep going too long.
Forgetting to lubricate after sharpening causes rust to form quickly.
Tightening the pivot bolt too much can damage the shears and make them hard to use.
Frequently Asked Questions
Can I sharpen my own shears, or do I need professional help?
You can absolutely sharpen garden shears at home with the right tools and technique. Most homeowners successfully sharpen their own shears using a sharpening stone, file, or hand sharpener. The process takes 15-30 minutes once you understand the bevel angle and proper filing strokes. Professional sharpening is an option if you prefer, but home sharpening is cost-effective and gives you control over maintenance timing.
What is the best sharpener for garden shears?
The best sharpener depends on your shear type and preference. Whetstones work well for precise control and are affordable. Diamond files handle tougher steel and last longer. Hand sharpeners offer convenience for quick touch-ups. For bypass shears, a medium-grit whetstone (800-1000 grit) or a 10-inch sharpening file is ideal. Hedge shears benefit from a flat file or whetstone that covers their longer blade. Start with a versatile option like a sharpening stone, it works for most home gardeners.
How can you tell if garden shears need sharpening?
Dull shears crush stems instead of cutting cleanly, leaving ragged edges that bruise plants and invite disease. Test by cutting a soft stem or paper: sharp shears slice smoothly with one motion; dull ones require force or multiple passes. If you notice torn leaves, crushed stems, or the need to squeeze harder than usual, it's time to sharpen. Most gardeners sharpen their shears once or twice per season, or after heavy use.
Will aluminum foil sharpen garden shears?
Aluminum foil is a quick maintenance trick, not a true sharpening method. Folding and cutting aluminum foil can help remove minor burrs and polish the blade edge, making dull shears feel slightly sharper temporarily. However, it does not restore a genuinely dull or damaged blade. For actual sharpening, use a whetstone, file, or hand sharpener. Aluminum foil is useful for quick touch-ups between proper sharpenings, but it should not replace regular maintenance.
Keeping your garden shears sharp makes pruning easier and keeps your plants healthier. At Downtown5, we understand that quality garden tools are an investment worth protecting. Our selection of reliable garden shears and maintenance accessories helps you maintain your tools properly and get years of use from them. Start with sharp shears from Downtown5, then maintain them with these simple techniques. Your garden will thank you.