

How to Arrange Furniture in a Studio Apartment
Table of Contents
- Measure Your Space and Map Traffic Flow
- Studio Apartment Layout Ideas That Work
- How to Divide a Studio Apartment Into Zones
- Multifunctional Furniture for Small Apartments
- Studio Apartment Layout With Bed and Desk
- Create Visual Openness and Reduce Clutter
- Common Furniture Arrangement Mistakes to Avoid
- Frequently Asked Questions
Last Updated: October 7, 2026
Measure Your Space and Map Traffic Flow
Before you start learning how to arrange furniture in a studio apartment, measure room dimensions, ceiling height, window locations, and door swings, these numbers prevent costly mistakes.
Next, map traffic flow: walk the path from entrance to bedroom area, bathroom, and kitchen, keeping a three-foot-wide walkway minimum. Mark it on your floor plan before placing anything.
Consider natural light: bright corners attract people, dark corners suit storage or sleeping. Position furniture to enhance, not block, light.
Studio Apartment Layout Ideas That Work
The best studio apartment layout divides your space into three functional zones, living, sleeping, and working, without walls, each with clear boundaries even if they're not physical.
Your studio's shape dictates which layout works. A square studio, narrow railroad, alcove, and L-shaped unit each reward a different arrangement. Here are four starting plans, plus the clearances that keep each livable.
Square Studio (roughly 400-550 sq ft)
A square footprint has no long wall to anchor furniture, so the risk is a "furniture island" in the middle. Split the square into two halves along one axis: put the bed against the wall farthest from the entry, and float the sofa perpendicular to that wall to create a living pocket. Rugs under the seating area and bed make the gap between them your implied hallway. Keep at least 30 inches between sofa back and bed foot.
Narrow Railroad Studio (roughly 300-450 sq ft, one long axis)
In a railroad layout, everything runs front to back, so resist lining both walls with furniture and choking the middle. Pick one side as the "furniture wall" and keep the opposite wall mostly clear except for a slim console or wall-mounted shelves. Place the bed at the far end, head against the short back wall, and run the desk and seating along the furniture wall. Aisles should be 36 inches minimum.
Alcove Studio (roughly 350-500 sq ft, with a nook)
The alcove is a pre-built sleeping or working zone. Put the bed there if the opening is at least 60 inches wide, enough for a queen with room to walk on one side. If narrower, use it for the desk or a reading chair and place the bed on the main wall. A curtain rod with floor-to-ceiling panels closes it off at night without a drill.
L-Shaped or Irregular Studio (roughly 450-650 sq ft)
Irregular rooms have a "dead" corner most people fill with random storage, turn it into the work zone instead. An L-shaped studio usually has one leg with less natural light; that's the right spot for a desk, since screen glare is lower and the area is visually quieter. Keep the long leg for living and sleeping, and use the corner where the legs meet for a tall bookcase that doubles as a divider.
A quick zoning checklist
- Sleep: bed head against a solid wall, not under a window if you can avoid it.
- Live: sofa facing the largest open floor area, not the bed.
- Work: desk near a window but perpendicular to it, so light hits the side of your face rather than the screen.
- Store: vertical storage on the wall you see least.
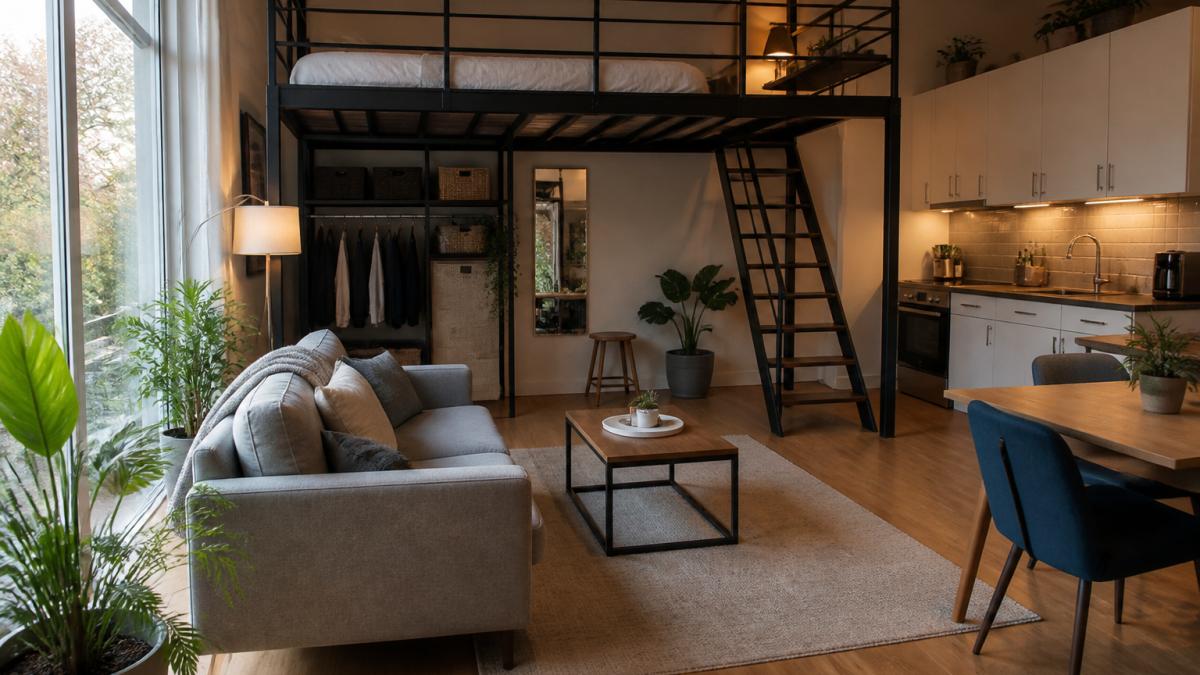
Area rugs are your secret weapon: one under the seating area defines that zone, another near the bed creates a separate sleeping space.
Vertical storage is crucial in small spaces. Wall-mounted shelves, tall bookcases, and hanging organizers draw the eye upward, making your studio feel taller and less cramped. Open-base furniture with visible legs also feels bigger than solid, heavy pieces.
How to Divide a Studio Apartment Into Zones
Creating visual separation without walls requires smart choices. Room dividers work well if you have the budget and floor space. A lightweight folding divider can hide your bed from the main living area.
Tall furniture divides space too: a bookcase between living and sleeping areas creates a natural boundary, and ceiling-to-floor curtains separate zones without using floor space.
Color and lighting define zones too.
Furniture arrangement itself divides space. Angle your sofa away from the bed and position your desk to face a wall, not your sleeping area, invisible boundaries that make your studio feel organized.
Multifunctional Furniture for Small Apartments
Multifunctional furniture is non-negotiable in a studio apartment, every piece should serve more than one purpose.
Fold-down desks are perfect for studios: they attach to walls, flip up when you need to work, and disappear completely when closed, freeing that wall space for other activities.
Sofa beds serve double duty as seating and sleeping surfaces for guests. Wall-mounted shelves store items while displaying decor. A coffee table with hidden storage keeps clutter out of sight.
Studio Apartment Layout With Bed and Desk
The bed-and-desk challenge is real in studios: most people need both sleeping and working space. Keep them visually separated and physically distant, but the right distance depends on how you use the room.
Start with your daily routine, not the furniture
Before you place anything, write down a typical weekday in three lines: when you wake, when you work, when you wind down. Then match the layout to the routine:
Multifunctional Clothes Rail Garment Hanging Stand Shoe Rack Home Storage Shelf →
- If you work from home full-time: the desk is not a guest, it's a primary zone. Give it a real wall, ideally near a window, and treat the bed as the secondary piece. A desk that folds down or rolls away at 6 p.m. is worth the trade-off if your studio is under 400 sq ft.
- If you work outside the home: the desk can be smaller and tucked into a corner or an alcove. Prioritize a comfortable bed and a clear living zone instead.
- If you host often: keep the bed visually contained (a divider, a curtain, or a loft) so guests aren't sitting next to your duvet.
- If you have mobility needs: plan for a 36-inch clear path from the bed to the bathroom and entry, and a 60-inch turning circle somewhere in the main room. These are the same clearances used in accessible residential design, and they make a studio easier for everyone.
Placement rules that hold up
Position your bed in a corner or against the longest wall to anchor it. Place your desk across the room, ideally near a window but perpendicular to it so glare doesn't hit your screen, maximum distance between work and rest zones helps your brain shift contexts.
If your studio is small, consider a lofted bed: it elevates your sleeping area and frees floor space below for a desk or seating. A loft works best with ceilings at least nine feet tall; below that, you'll feel the ceiling pressing down at the desk.
Renter-friendly ways to separate bed and desk
You don't need to drill to create a boundary. These options all reverse cleanly at move-out:
- Tension-rod curtain: spans a doorway or alcove opening without screws. Use a floor-length panel so it reads as a wall, not a shower curtain.
- Freestanding bookcase: a 30-inch-wide, 72-inch-tall unit placed perpendicular to the wall creates a real divider and adds storage. Anchor it to the wall with a furniture strap if you have kids or pets.
- Folding screen: lightweight, movable, and easy to store flat. Best for hiding a bed from the entry, less effective as a sound barrier.
- Rolling desk or cart: lets the work zone disappear into a closet at the end of the day.
Storage that keeps the desk from spreading
Storage near your desk prevents clutter from spreading. A narrow bookcase or wall-mounted shelves keep supplies contained; a tidy desk makes the whole studio feel calmer. A common pattern: one shelf for active projects, one drawer for supplies, one bin for anything that doesn't belong.
Common bed-and-desk mistakes
- Putting the desk at the foot of the bed. It looks efficient but puts work in your line of sight at night.
- Using an oversized executive desk. A 60-inch desk eats a studio. A 40-48 inch desk handles a laptop, monitor, and notebook.
- Skipping the chair clearance. You need at least 30 inches behind the desk chair to push back and stand up.
- Forgetting cable management. A single cable tray or a clip-on raceway keeps cords off the floor and out of the walkway.
Create Visual Openness and Reduce Clutter
Clutter is the enemy of small spaces, every visible item steals visual space.
Light colors make studios feel bigger: pale walls, light furniture, and neutral accents expand the sense of space.
Thin furniture legs beat solid bases, tables and chairs with visible space underneath feel lighter and make a studio airier.
Vertical lines draw the eye upward, making ceilings feel higher, tall bookcases, wall-mounted shelves, and floor-to-ceiling curtains all work.
Limit your palette to three main colors, one dominant neutral, one accent, one highlight.
Common Furniture Arrangement Mistakes to Avoid
Pushing all furniture against walls makes studios feel awkward, spreading pieces too far apart and wasting the center.
Blocking windows with large furniture steals natural light. Windows are valuable real estate in small spaces.
Furniture that's too large overwhelms the room, a huge sectional, massive dresser, or oversized desk will dominate.
Mixing too many styles creates visual chaos.
Ignoring your daily routine leads to poor layouts.
Forgetting traffic flow creates bottlenecks.
Not using vertical space wastes potential.
At Downtown5, we understand that furnishing a studio apartment requires smart choices and quality pieces that earn their space.
Frequently Asked Questions
What is the best way to arrange furniture in a studio apartment with a bed and desk?
Position your bed against the longest wall or in a corner to anchor the sleeping area. Place your desk perpendicular to the bed or along an adjacent wall to create visual separation. Use a room divider, tall bookcase, or area rug to establish distinct zones. Ensure at least three feet of clearance between furniture pieces for comfortable traffic flow. This arrangement keeps your work and sleep areas psychologically separate while maximizing usable floor space.
How can I make my studio apartment feel bigger with furniture arrangement?
Choose furniture with open bases and thin legs to maintain sight lines across the room. Arrange pieces along walls rather than floating them in the center. Use vertical storage solutions like wall-mounted shelves and tall, narrow bookcases to draw the eye upward. Select a light-colored area rug to define zones without visually breaking up the floor. Keep pathways clear and avoid clustering furniture in the center, which makes the space feel cramped and cluttered.
What kind of furniture is appropriate for a small studio apartment?
Prioritize multifunctional pieces like ottomans with storage, murphy beds, fold-down desks, and sofa beds. Select appropriately scaled furniture that doesn't overwhelm the room. Look for pieces with storage built in, such as beds with drawers or tables with shelves. Avoid oversized sectionals or heavy pieces that consume too much floor space. A clothes rail garment stand with shelving, like the Multifunctional Clothes Rail from Downtown5, provides essential storage while maintaining an open feel.
How do you separate a sleeping area from the living area in a studio?
Use a room divider, tall bookcase, or curtain rod to create a physical boundary between zones. An area rug anchors the sleeping area and signals a visual separation. Arrange furniture to define each space: position the bed on one side and the sofa on the other. Lighting also helps, use different fixtures for each zone. A vintage wrought iron room divider adds style while clearly delineating your bedroom from your living space without permanently closing off the room.