

13 Easy Home Upgrades for Renters That Protect Your Deposit
Table of Contents
- Why Renters Are Upgrading (Without Asking Permission)
- Quick Comparison: Best Easy Home Upgrades for Renters
- Removable Wallpaper for Apartments: The Fastest Transformation
- Swap Cabinet Hardware and Fixtures for an Instant Refresh
- Renter-Friendly Kitchen Upgrades That Go Beyond the Basics
- How to Upgrade Rental Lighting Without Touching the Wiring
- Deposit Recovery: Document Everything and Negotiate Smart
- Conclusion: Your Rental, Your Rules
- Frequently Asked Questions
Last Updated: September 8, 2026
Renting often means living with builder-grade beige walls, dated fixtures, and a strict lease. The key to easy home upgrades for renters lies in choosing reversible, non-permanent solutions that enhance your daily life without risking your security deposit. This guide from Downtown5 walks you through deposit-safe transformations that deliver serious style impact.
The right accessories and removable products can completely change a room's feel without a single nail in the wall. Below, we'll show you how to execute these upgrades, protect your deposit with smart documentation, and negotiate effectively. These strategies work whether you're styling a studio or a three-bedroom, and they all come with simple installation you can finish in an afternoon.
Why Renters Are Upgrading (Without Asking Permission)
The traditional rental experience meant living with whatever the landlord provided. That mindset has shifted dramatically. Renters today treat their lease as a starting point, not a final design decision, and they pursue aesthetic upgrades that are fully reversible. This trend aligns with broader data showing that Zillow's 2024 rental analysis found listings featuring open shelving receive more saves per day than similar units without it, proving renters actively seek out personalized, styled spaces.
The driving force is simple: your home should reflect you. Waiting for permission to make it feel livable can mean years of staring at surfaces you dislike. Instead, renters are embracing the "stay and upgrade" philosophy, a term that Citizens Bank's 2026 survey uses to describe Americans improving their current living spaces rather than moving. For apartment dwellers, this means focusing on temporary fixtures and removable decor that travel with you to your next place.
A common approach involves replacing cabinet pulls, doorknobs, and switch plates as a primary method to personalize rental spaces without permanent damage, a trend highlighted by Style by Emily Henderson. These small hardware swaps deliver a high-impact refresh for minimal cost and effort.
Quick Comparison: Best Easy Home Upgrades for Renters
Not all upgrades are created equal. Some offer instant visual drama, while others quietly improve your daily function. This comparison table breaks down the most effective easy home upgrades for renters by impact, cost, and installation effort.
| Upgrade | Impact | Approximate Cost | Installation Time | Deposit Risk |
|---|---|---|---|---|
| Peel-and-Stick Wallpaper | High | $25-$110 | 1-2 hours | Low |
| Cabinet Hardware Swap | High | $20-$60 | 30 minutes | Low |
| Battery-Operated Sconces | Medium | $30-$80 | 15 minutes | Very Low |
| Smart Bulbs & Plugs | Medium | $15-$50 | 10 minutes | None |
| Window Treatments | High | $40-$150 | 1 hour | Low |
Removable Wallpaper for Apartments: The Fastest Transformation
Removable wallpaper for apartments is the single most dramatic change you can make without violating your lease. Modern peel-and-stick options use a self-adhesive backing that presses onto smooth walls and peels off cleanly when you move out. It's ideal for creating an accent wall, updating a backsplash, or covering an ugly panel.

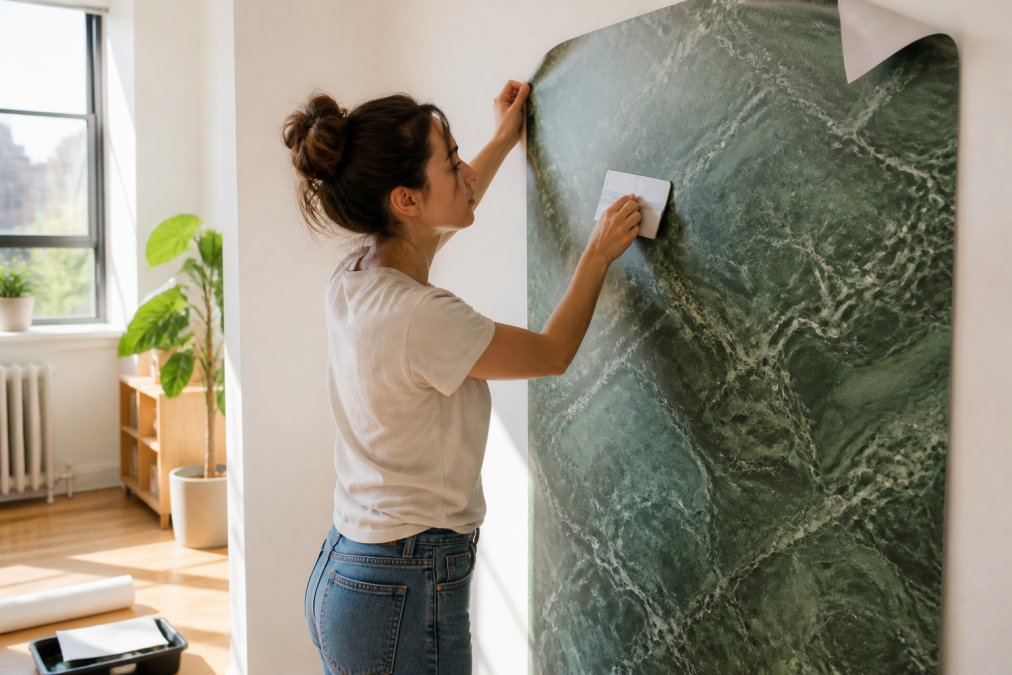
Proper surface preparation is the secret to a flawless finish. The wall must be clean, dry, and free of dust or grease. Wipe it down with a damp cloth and let it dry completely before you start. Measure carefully and cut the wallpaper slightly larger than needed, then trim the edges with a sharp utility knife.
For a sophisticated look, the Modern Green Marble Stone Tile Peel And Stick Wallpaper from Downtown5 adds a high-end tile aesthetic to a kitchen or bathroom at $110.00. It's a practical choice for renters who want the look of a marble backsplash without the permanence or cost of real tile.
Swap Cabinet Hardware and Fixtures for an Instant Refresh
If your kitchen or bathroom has dated, brass-toned handles or cheap plastic knobs, swapping them out is the highest-impact, lowest-effort upgrade available. This is purely reversible: you simply unscrew the old hardware and screw in the new. Store the originals in a labeled bag so you can reinstall them on move-out day.
Sleek black matte fixtures modernize a space instantly, while brushed nickel offers a classic, durable look. This simple change can make cabinets look custom and expensive. The same logic applies to light switch plates and outlet covers, which are among the cheapest home upgrades for renters you can buy.
Renter-Friendly Kitchen Upgrades That Go Beyond the Basics
Renter-friendly kitchen upgrades extend far beyond hardware swaps. The most effective projects focus on the two biggest pain points in any rental kitchen: the dated backsplash and the lack of functional storage. This section gives you a decision framework and the exact steps to execute the highest-impact, fully reversible changes.
The Temporary Backsplash Decision: Peel-and-Stick vs. Contact Paper
The single most dramatic kitchen upgrade is covering the builder-grade tile or painted drywall behind your counter. Choosing between removable products depends on your surface and timeline.
Peel-and-stick tile sheets are the best choice for covering existing tile or textured walls. They are thick (typically 1-2 mm), have a rigid structure, and hide minor imperfections. The Modern Green Marble Stone Tile Peel And Stick Wallpaper from Downtown5, priced at $110.00, is a prime example. It provides a genuine stone-tile aesthetic and is durable enough to withstand heat and moisture near a stovetop, though you should still keep it at least six inches away from an open flame.
Standard contact paper is thinner and cheaper, making it ideal for smooth, painted drywall. It is not suitable for covering existing tile because every grout line will telegraph through the surface. If you choose contact paper, the wall must be perfectly smooth and clean.
The 4-Step Installation Sequence That Prevents Damage
Regardless of which product you choose, the installation sequence is identical. Skipping any of these steps is the primary reason peel-and-stick products fail or damage walls on removal.
- Degrease the surface. Kitchen walls accumulate a thin film of cooking oil that is invisible to the eye. Wipe the entire area with a 50/50 solution of white vinegar and water, then dry it completely. Adhesive will not bond to grease.
- Test a small patch first. Cut a 2-inch square and press it onto the wall in an inconspicuous corner. Wait 24 hours. If the edges curl or the patch slides, the surface is not clean enough or the wall has a texture that will prevent adhesion.
- Apply from the center outward. Peel back only 4-6 inches of the backing at a time. Press the sheet onto the wall with a plastic smoother, working from the center toward the edges to push out air bubbles. Do not stretch the material.
- Trim with a fresh blade. Use a sharp utility knife with a new blade for every project. A dull blade will tear the material and leave a jagged edge. Cut slightly oversize, then trim flush against the counter or cabinet edge.
Removal: The Heat-and-Peel Method
When your lease ends, removal is where you protect your deposit. Do not simply yank the material off the wall. Instead, use a hairdryer on medium heat, holding it 2-3 inches from the surface. Move the hairdryer slowly across a 12-inch section for about 30 seconds. The heat softens the adhesive, allowing you to grip a corner and peel at a 45-degree angle. If any adhesive remains, a dab of rubbing alcohol on a microfiber cloth removes it without damaging the paint.
Storage Upgrades That Add Function Without Permanent Installation
Beyond the backsplash, the most impactful kitchen upgrade is adding vertical storage. Rental kitchens are notoriously short on cabinet space, and freestanding solutions are the answer.
A multifunctional cart or shelving unit can add 15-20 square feet of usable storage. The Multifunctional Clothes Rail Garment Hanging Stand Shoe Rack Home Storage Shelf from Downtown5, priced at $107.20, is a versatile option. While designed for garments, its strong metal frame and additional shelf make it perfect for storing small appliances, cookware, or dry goods. Place it against a wall or in a pantry nook to create an instant, movable storage system.

The 30-Day Test for Kitchen Upgrades
A practical rule for any kitchen upgrade is the 30-day test. Install your chosen upgrade and live with it for a month. If, after 30 days, you find yourself working around it, or if it has not improved your daily routine, remove it and try a different approach. The goal is not to decorate; it is to make your kitchen function better for the way you actually cook and live.
How to Upgrade Rental Lighting Without Touching the Wiring
Lighting is the most overlooked element in rental decor, yet how to upgrade rental lighting is simpler than most people think. You don't need to rewire anything or call an electrician. The secret is to focus on plug-in fixtures, smart bulbs, and battery-operated lights that deliver ambiance without permanent installation.
The most common mistake is relying solely on the harsh overhead light that comes with the apartment. This single source of light creates a flat, unflattering atmosphere. Instead, layer your lighting. Place floor lamps in dark corners, add table lamps for task lighting, and use battery-operated sconces to create wall washing effects.
A quality floor lamp is a foundational piece for any living room or bedroom. The Floor Lamp Free Standing Light With Bulb Linen Shade Remote Control from Downtown5 provides soft, diffused light that transforms the mood of a room. Priced at $91.91, it features a brightness-adjustable bulb and a remote control.

Smart home technology has also made lighting upgrades easier. BuzzFeed's 2025 guide to renter-friendly tech highlights the widespread use of smart plugs and smart bulbs to enhance lighting and energy control without requiring electrical wiring changes. These devices screw into your existing fixtures and connect to your Wi-Fi, letting you control brightness and color from your phone or voice assistant.
Deposit Recovery: Document Everything and Negotiate Smart
The fear of losing a security deposit often stops renters from making any changes at all. The risk of deposit loss versus the benefit of aesthetic upgrades is a constant tension, as discussed in renter forums on apartment hacks. However, with a systematic documentation protocol and a proven negotiation framework, you can upgrade confidently and still secure a full deposit return.
The 3-Stage Documentation Protocol
Most deposit disputes come down to one thing: a lack of evidence. Landlords have the advantage because they hold the deposit and can make claims about damage. Your defense is a timestamped, cloud-backed record that contradicts those claims. This protocol takes 45 minutes total and covers every scenario.
Stage 1: Move-In Baseline (Day 1, before you unpack anything)
Walk through every room with your phone camera in landscape mode. Narrate the video as you go, stating the date and the address. Focus on these specific areas:
- Walls: Zoom in on every scuff, nail hole, and patch. Most landlords consider normal wear and tear (small scuffs, a few pin holes) as acceptable, but you need proof of pre-existing damage to avoid being charged for it.
- Floors: Capture any scratches on hardwood, stains in carpet, or cracks in tile. Kneel down to get close-up shots.
- Fixtures: Document the condition of the cabinet hardware, light fixtures, and outlet covers. If a switch plate is cracked or a knob is loose, this is your evidence.
- Appliances: Open the oven, refrigerator, and dishwasher. Photograph the interior condition, including any rust or stains.
After the video, take 10-15 still photos of the most damaged areas. Upload everything to a cloud service (Google Drive, iCloud, or Dropbox) in a folder named "[Your Name] - [Address] - Move-In Date." Do not rely on your phone's local storage; if you lose your phone, you lose your evidence.
Stage 2: Pre-Upgrade Condition (Before you install anything)
Immediately before installing peel-and-stick wallpaper, swapping hardware, or making any other change, take a 60-second video of the specific area you are about to modify. This proves the surface was in good condition before you touched it.
Stage 3: Move-Out Restoration (The day you finish restoring the unit)
Take a final video showing the apartment restored to its original condition. Include close-ups of the walls where you had peel-and-stick wallpaper to prove you removed it cleanly. Show the original hardware reinstalled. Narrate the video, stating: "This is the condition of the unit after I restored it. All temporary upgrades have been removed, and the apartment is in the same condition as documented in my move-in video from [date]."
This before-and-after documentation is your strongest tool in a dispute. If a landlord claims damage, you can present both videos side by side to show the condition is unchanged.
The Negotiation Framework: How to Get Written Permission for Semi-Permanent Changes
For more substantial changes, such as painting a wall or installing a closet system, always ask for written permission first. A simple email to your landlord can secure approval. The key is to frame the request as a value-add for the property, not a personal preference.
Here is a negotiation script that works:
"Subject: Request for Temporary Apartment Improvement Hello [Landlord Name], I'm writing to request permission to [describe the change] in my apartment. This improvement is fully reversible and I will restore the unit to its original condition before my lease ends. I believe this will enhance the value and appeal of the property. Please let me know if this is acceptable."
If your landlord hesitates or says no, use this follow-up script:
"I understand your concern. To address it, I'm happy to sign an addendum stating that I will restore the unit to its original condition at my own expense before the lease ends. I can also provide a timeline for the project and photos of the completed work. Would that make you more comfortable approving this change?"
This proactive approach builds goodwill and protects your deposit. The addendum offer can be effective because it transfers the risk from the landlord to you.
The 30-Day Move-Out Checklist
To ensure you do not forget a critical step, follow this checklist in the final month of your lease:
- Day 30 before move-out: Begin removing all peel-and-stick products. Do one wall per day to avoid rushing.
- Day 14 before move-out: Reinstall all original hardware. Store your upgraded hardware in a labeled box for your next place.
- Day 7 before move-out: Patch any holes you made (if permitted) with spackle. Sand smooth and touch up paint if you have matching paint.
- Day 3 before move-out: Deep clean all surfaces, including inside appliances.
- Day 1 before move-out: Take your final move-out video as described in Stage 3. Send a copy to your landlord via email with a note: "Please find attached my move-out documentation. I have restored the unit to its original condition. I look forward to receiving my full deposit refund."
This documentation-first approach transforms the deposit recovery process from a gamble into a managed outcome. You are not hoping the landlord is fair; you are providing evidence that makes a fair outcome the only logical conclusion.
Conclusion: Your Rental, Your Rules
Upgrading your rental doesn't require a security deposit gamble or permanent alterations. By focusing on removable wallpaper, hardware swaps, strategic lighting, and functional storage, you can create a home that feels entirely yours. The best easy home upgrades for renters are reversible, budget-friendly, and impactful, proving that a lease agreement doesn't have to limit your style.
Making these changes is about more than just decor; it's about enhancing your daily routine and taking pride in your living space. Downtown5 offers a curated selection of high-quality home goods, from peel-and-stick wallpaper to elegant lighting and storage solutions, designed to help you refresh your lifestyle. With seamless shipping and exceptional value, you can find everything you need to execute these upgrades this weekend. Get started with Downtown5 and transform your apartment into a space you love coming home to.
Frequently Asked Questions
What are the best renter-friendly home improvement ideas that won't risk my deposit?
Focus on non-permanent swaps. Peel-and-stick wallpaper, new cabinet pulls, and switch plate covers are all reversible and leave no marks. Replace shower heads and faucets, but keep the originals to reinstall before moving out. Always use damage-free hanging strips for art and mirrors. Document the condition of each upgrade with photos so you have proof you left the unit as found.
Can I change the lighting in my rental apartment?
Yes, without rewiring. Swap out plug-in floor lamps for models with dimmers and remote controls, like the Floor Lamp with Linen Shade from Downtown5. Use smart bulbs and plugs to control existing fixtures. For walls, choose battery-operated sconces that stick on without screws. These options are fully removable and travel with you to your next place.
Will removable wallpaper damage my walls when I take it down?
Quality peel-and-stick wallpaper is designed to be damage-free, but results depend on your wall's paint. Test a small patch first, like behind a door. Remove it slowly at a 180-degree angle to minimize stress on the paint. If your walls have a flat or matte finish, the risk of peeling paint is higher. Using a hairdryer to warm the adhesive makes removal safer and easier.
What are some budget-friendly renter-friendly kitchen upgrades?
Start under $50. Swap out dated cabinet knobs and pulls for modern brushed brass or matte black options. Install a peel-and-stick backsplash behind the stove. Use adhesive under-cabinet lighting strips to brighten countertops. Replace the faucet with a model you can install yourself, keeping the original to reattach before you move. These changes make the space feel custom without a renovation.
How do I get my security deposit back after making upgrades?
Take timestamped photos of every upgrade immediately after installation. Keep all receipts and the original hardware you removed. Before moving out, reinstall the original fixtures and patch any small holes with spackle. Review your lease agreement for clauses about alterations. If your landlord deducts for damage, provide your photo evidence and politely ask for an itemized invoice for the repairs.