

DIY Pet Feeding Station Ideas: 7 Designs That Work
Table of Contents
- Why a DIY Pet Feeding Station Matters
- DIY Dog Feeding Station: The Nightstand Conversion
- Dog Food Station with Storage: The Pallet Platform
- How to Make a Dog Feeding Station with Raised Bowls
- DIY Cat Feeding Station: Compact and Elevated
- Multi-Pet Feeding Stations for Shared Spaces
- Food-Safe Materials, Cleaning, and Stability
- Common Mistakes to Avoid
- Frequently Asked Questions
Last Updated: October 13, 2026
Why a DIY Pet Feeding Station Matters
A DIY pet feeding station transforms how you feed your pets while keeping your home organized and stylish.
A well-designed station solves food storage, water splashes, and clutter at once, and stops pets from knocking over bowls or dragging food around.
You can build one yourself using furniture you already own or affordable pieces from Downtown5, custom-fit to your space, your pet, and your style.
DIY Dog Feeding Station: The Nightstand Conversion
Converting a nightstand into a feeding station is the easiest DIY option: it sits at the perfect height, has built-in storage, and costs far less than a custom feeder.
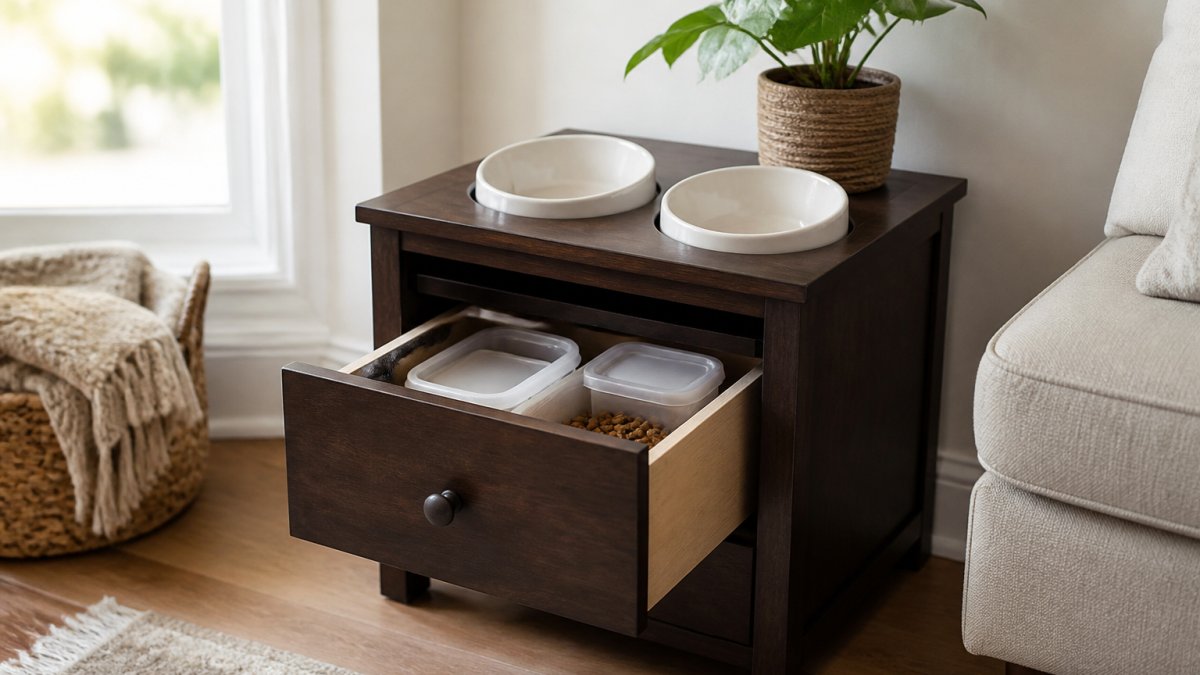
It suits small to medium dogs: the drawer holds food, treats, and supplies, while the top holds two bowls side-by-side.
What You'll Need
Gather these items before you start:
- One nightstand (wood or composite)
- Two pet bowls (ceramic or stainless steel)
- Sandpaper or wood stain (optional)
- Wood sealer or food-safe finish
- Drawer liner or mat for water resistance
- Small L-brackets (optional, for stability)
- Drill and screws (if adding features)
- Measuring tape
Step-by-Step Assembly
Step 1: Prepare the nightstand. Clean it thoroughly and sand any rough edges.
Step 3: Position the bowls. Mark where they'll sit, spacing them 6-8 inches apart so your pet can eat without bumping bowls together.
Step 4: Add a mat. A rubber mat or absorbent pad under the bowls catches spills and keeps the nightstand dry.
Step 5: Stock the drawer. Fill it with food, treats, and supplies, kept organized for quick access.
Done. Your feeding station is ready to use.
Dog Food Station with Storage: The Pallet Platform
A pallet platform creates a raised, spacious feeding area for larger dogs or multiple pets. Pallets are affordable, sturdy, and easy to customize.
Build a simple frame from two pallets, sand smooth, apply a food-safe finish, add a waterproof mat on top, and attach storage bins underneath.
Everything stays in one organized zone: splashes contained up top, food fresh in sealed containers below.
How to Make a Dog Feeding Station with Raised Bowls
Raised bowl stands help some dogs and hurt others. Match the height and bowl opening to your specific dog, not a generic size chart.
When Raised Bowls Help, and When They Don't
Raised feeding is commonly recommended for:
- Senior dogs with arthritis or neck stiffness
- Large and giant breeds that struggle to reach the floor
- Dogs recovering from neck, spine, or shoulder injury
- Dogs with megaesophagus (only under veterinary direction, usually with a Bailey chair rather than a simple stand)
Raised feeding is often a poor fit for:
- Puppies still growing, proportions change every few weeks, so a fixed height becomes wrong quickly
- Dogs with a history of bloat (gastric dilatation-volvulus), where some veterinary guidance advises against elevated feeding
- Flat-faced breeds (brachycephalic) that need their airway aligned while eating
- Small dogs that eat fine at floor level, raising the bowl can increase swallowing effort
If your dog has a medical condition, ask your veterinarian before changing feeding height. A stand is a comfort tool, not a treatment.
Measuring for Height
Use your dog's standing posture, not a breed chart:
- Have your dog stand naturally on a level floor.
- Measure from the floor to the withers.
- Subtract 4-6 inches, that's your target bowl-rim height.
As a rough starting range:
- Dogs under 15 lbs: bowl rim 2-4 inches off the floor
- Dogs 15-50 lbs: bowl rim 6-10 inches off the floor
- Dogs over 50 lbs: bowl rim 10-14 inches off the floor
Watch your dog eat: a level or slightly downward neck means the height is close; reaching up or crouching means adjust.
Sizing the Bowl Opening
The bowl cutout matters as much as height. Too small forces whiskers against the rim; too deep makes flat-faced dogs struggle.
- Measure the bowl across its top outer rim and add 1/4 to 1/2 inch of clearance for the cutout.
- For a recessed top, the cutout should be slightly larger than the bowl's widest point so it drops in without wobbling.
- For a flat top with a mat, a silicone ring or non-slip pad under the bowl is enough.
- Wide, shallow bowls suit most dogs better: 2-3 inches deep for medium and large dogs, 1.5-2 inches for small dogs.
Materials and Tools
- 1x6 or 1x8 boards (pine, poplar, or composite decking)
- Wood screws (1-1/4 to 1-5/8 inch) and wood glue
- Sandpaper (120, 180, 220 grit)
- Food-safe finish: mineral oil, beeswax blend, or a food-contact-rated polyurethane
- Drill and drill bits
- Jigsaw or hole saw sized to your bowl cutout
- Measuring tape, pencil, square
- Two stainless steel or ceramic bowls
- Silicone mat or non-slip pads
Assembly
- Cut the top panel to your bowl layout, marking bowl centers at least 8 inches apart for one dog, more for a wide-chested breed.
- Cut the bowl openings with a jigsaw or hole saw and test-fit the bowls before assembling anything else.
- Cut the legs or side panels to your measured height; legs should be at least 3/4 inch thick for stability on a medium or large dog.
- Assemble with glue and screws, pre-drilling to avoid splitting.
- Sand all edges and surfaces the dog will touch, rounding over the bowl opening edges.
- Apply a food-safe finish and let it cure fully per the label, some need several days.
- Add non-slip feet or a silicone mat underneath.
Stability and Cleaning
A raised stand tips when a dog pushes off it. Wider legs, a lower center of gravity, and non-slip feet reduce tipping; for large dogs, anchor it to the wall with an L-bracket.
Wash bowls daily with mild soap and hot water, wipe the stand weekly, and re-oil or re-seal mineral-oil and beeswax finishes every few months or whenever the wood looks dry. Replace any stand with cracks, splinters, or flaking finish near the bowl area.
DIY Cat Feeding Station: Compact and Elevated
Cats prefer feeding stations that are elevated, quiet, and separate from the litter box; a compact design saves space in apartments.
Build a simple wooden box 12-18 inches tall with a recessed top for two small bowls, painted or stained to match your decor.
Elevated feeding reduces strain on a cat's spine and keeps food away from dust and floor debris.
Add a waterproof mat underneath to protect floors from spills.
Multi-Pet Feeding Stations for Shared Spaces
Multiple pets need separate feeding zones to prevent resource guarding, food theft, and under-eating. Each animal needs its own bowl location, approach path, and enough visual separation not to feel cornered.
Layout Options That Actually Work
Side-by-side platform. One wide platform with two to four recessed cutouts spaced 10-14 inches apart, best for pets of similar size and speed.
Separate stations, shared storage. Two independent feeding surfaces in different parts of the room, both fed from one central cabinet or drawer unit.
Cubby or cabinet style. A low cabinet with individual open cubbies, one bowl each, the walls acting as visual barriers. Works well for two or three cats or slow-eating small dogs.
Spacing and Bowl-Count Rules
- One bowl per pet, plus a spare water bowl elsewhere.
- Minimum 12 inches between bowl centers for cats and small dogs; 18-24 inches for medium and large dogs.
- Keep each station at least 3 feet from the litter box and 6 feet from another pet's station if either shows guarding behavior.
- If one pet eats faster, feed it in a separate room or behind a baby gate, using the station only for the slower eater.
Managing Different Diets and Speeds
Multi-pet homes rarely feed the same food to every animal. Use labeled, sealed containers, one per pet, and pre-portion each meal the night before so you place the correct bowl at the correct station at feeding time.
For fast eaters, a slow-feeder insert or muffin-tin-style bowl slows intake; for grazers, a covered bowl or low-traffic corner reduces interruptions.
Adapting for Cats and Dogs Together
Cats eat best on a raised surface a dog can't reach, a counter-height shelf, wall-mounted ledge, or low cabinet top. Mount a small cat station 24-30 inches off the floor and keep the dog's station at floor or low-platform level; this prevents most dog-eats-cat-food problems without training.
For multi-cat homes, avoid one tight row of bowls, cats are solitary feeders, and a row invites one cat to guard the whole line. Two or three small stations in different corners work better than one long platform.
Storage That Scales
A multi-pet station needs more storage. Plan for:
- One sealed food bin per pet (or one large bin with removable dividers)
- A treat drawer or bin separate from daily food
- A small bin for medications, supplements, or pill pockets
- A hook or clip for a measuring scoop and spare leash or collar
Label everything, in a multi-pet home, the real failure mode is grabbing the wrong food at 6 a.m.
Food-Safe Materials, Cleaning, and Stability
Use only food-safe materials, avoiding varnishes, paints, or finishes with harmful chemicals.
Food-safe finishes include:
- Mineral oil
- Beeswax
- Food-grade epoxy
- Polyurethane rated for food contact
- Natural wood sealers
Check product labels. Many standard wood stains contain toxins that can leach into food or water.
Clean weekly: wipe bowls and surfaces with mild soap and water, dry thoroughly to prevent mold, and check for splinters or cracks.
Stability matters too: secure the station to the wall or floor for large or energetic pets, and add rubber feet or non-slip pads to prevent tipping and sliding.
| Element | Purpose | Maintenance |
|---|---|---|
| Food-safe finish | Protects wood, prevents toxins | Reapply annually |
| Rubber mat | Catches spills, protects floors | Wash weekly |
| Non-slip pads | Prevents tipping, stabilizes bowls | Check monthly |
| Drawer liner | Protects interior, eases cleanup | Replace as needed |
Common Mistakes to Avoid
Don't skip the finish. Bare wood absorbs water and harbors bacteria.
Don't place the station near the litter box.
Don't ignore water resistance, use waterproof materials where water will sit, and seal seams and edges.
Don't forget stability, a wobbly station frustrates your pet and wastes food.
Don't overcomplicate the design. Simple stations are easier to clean and maintain.
A DIY pet feeding station keeps your home organized while improving your pet's comfort and health.
Frequently Asked Questions
How high should a DIY pet feeding station be?
Raised feeding stations reduce strain on your pet's neck and joints. For dogs, the bowl height should align with their chest or elbow when standing. Small dogs typically need 4-8 inches of elevation, while large dogs benefit from 8-12 inches. Cats prefer lower heights, around 2-4 inches. Measure your pet's height at the shoulder, then subtract 4-6 inches to find the ideal bowl position. Proper height improves digestion and reduces bloating in deep-chested breeds.
What materials are safest for a DIY pet feeding station?
Use food-safe, water-resistant materials that won't splinter or harbor bacteria. Solid wood sealed with pet-safe, non-toxic finishes works well, as does stainless steel and ceramic. Avoid treated plywood, which may contain harmful chemicals. For surfaces that contact food or water, apply food-grade sealants or polyurethane. Ensure all materials are smooth and free of sharp edges. Stainless steel bowls are the most durable and easiest to clean, while ceramic and glass are safe alternatives.
Can I turn an old nightstand into a pet feeding station?
Yes, nightstands are ideal for upcycling into feeding stations. Their height is perfect for small to medium dogs, and the drawer provides storage for food and supplies. Remove or modify the top shelf to fit two bowls side by side, seal the wood with pet-safe finish, and install a drawer divider to organize food and accessories. Add a waterproof mat inside the drawer to protect against spills. This approach is budget-friendly, keeps your feeding area organized, and adds functional decor to your home.
How do I keep a DIY pet feeding station clean and organized?
Place a waterproof mat under bowls to catch spills and protect the floor. Use drawer dividers or small containers to separate dry food, treats, and supplies. Clean bowls daily and wipe down surfaces weekly with pet-safe cleaners. Store dry food in airtight containers to keep it fresh and prevent pests. Check the mat regularly for moisture and replace if needed. For wooden surfaces, use a slightly damp cloth and dry immediately to prevent water damage. Label compartments to make restocking quick and easy.